Introduction
So you got a new desktop computer and now you have to figure out how to set it up. It may look challenging and complicated, with a mess of cables and peripherals, but setting up a desktop is actually very easy. In this article, we'll explain how to connect everything and get started using your computer.
First, make sure you have a desktop computer and not a laptop. Laptops are much simpler, and in most cases you should just be able to plug them in and power them on. (See Step 8 for connecting to wifi.) Desktops require more work to get set up, but this does come with advantages. For one, desktop computers are far easier on our bodies to use for long periods of time, as the monitor, keyboard, and mouse are all adjustable to wherever makes the most sense to your body. For another, all of the external components (like your keyboard, mouse, and monitor) can be replaced easily if anything breaks or if you find one you like better.
For this article, we'll be using an HP Compaq 8200 Elite Ultra-slim Desktop, which is one of the models we at Computer Reach distribute most often. If you have a different desktop, all of the instructions should still be applicable, and we've taken care to note any differences between our computer and others and we’ve tried to make my instructions as general and widely-applicable as possible.
.png?width=688&height=518&name=unnamed%20(4).png)
Taking account of your hardware
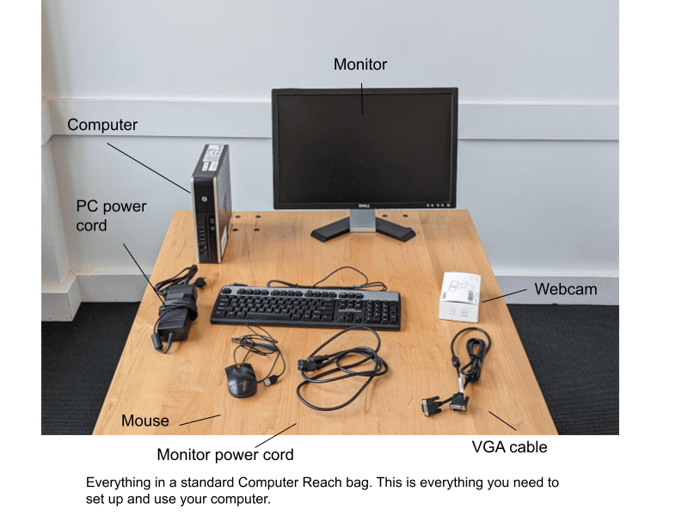
If you received your computer from Computer Reach, you should have received a bag with the following:
- A PC
- A monitor
- 1 VGA cable
- 1 PC power cable*
- 1 monitor power cable*
- A keyboard
- A mouse
- A webcam
- A USB wifi adapter (a "wifi nub"), which should already be plugged in
* Note: Many computers use the same kind of power cable as the monitor. If your computer has an internal power supply, then you should have received two identical cables.
This may look like an overwhelming amount of stuff, but connecting them all together is actually very easy. Every one of these parts connects in a really particular way; every piece will only fit in the sockets it's designed to go into.
Step 1: Placing your PC
Begin by laying out the different components where you want to use them without plugging anything in. By doing this before you plug anything in, you will make it easier to move anything if the placement doesn’t work.
Proper placement of the computer is important for the health of the machine as well as for your body. Using an improperly-placed computer for long periods of time can be damaging to your health, and can lead to numerous conditions including repetitive strain injuries and spinal problems. Health experts recommend placing your monitor at eye level, with your eyes level with the top third of the screen; if you need reading glasses, you can lower the screen until it’s in a comfortable reading position for you. The important thing is that you shouldn’t need to bend your neck. It is also recommended that you place the keyboard directly in front of your seat and slightly below your elbows when you sit up straight. See this guide for more information.
It is also important for the health of your computer to place it in a way that doesn’t strain the various parts of the computer. Be sure to leave a few inches of space between the back of your computer and any walls or other surfaces which could restrict airflow or require you to bend the cable connectors too sharply.
If your computer is relatively small, like ours, you can place the computer on the desk with the monitor, either beside it or underneath it. If your computer is a large tower, it is usually best to place it on the floor underneath or beside your desk and run the cables behind it.
Step 2: Connect power cables
Connect the power cables to your computer and monitor and run the cables to the outlet. Don’t plug in the computer cable to the wall just yet–we don’t want it to accidentally turn on when we aren’t ready yet. (It’s generally okay to do it if coming back to it is too difficult or inconvenient, though.) Plug in the monitor and make sure it’s turned on by checking for any lights around the power button or checking if any kind of image appears on the screen. If the monitor isn’t turned on, turn it on by pressing the power button, usually on the lower right side of the monitor. You shouldn’t see any real picture on the screen, aside from a possible manufacturer logo or short text notice about not having a signal. The computer isn’t turned on yet.
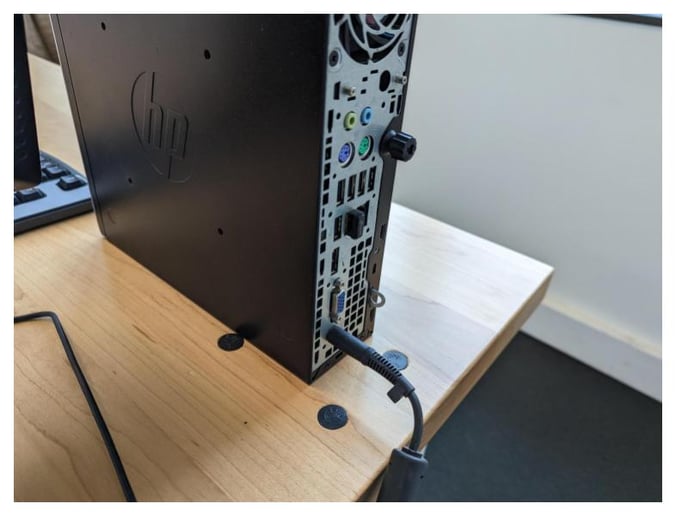
Step 3: Connect the computer and monitor together
If you received your computer from us, then you should have also received a VGA cable, like this one: .jpg?width=688&height=516&name=How%20to%20Set%20Up%20Your%20Computer%20(1).jpg)
There are other common connectors out there, including DVI, DisplayPort, and HDMI. If your computer and monitor have these connectors, you can just plug them into the corresponding sockets on the back of the computer and the monitor.
If you need to use VGA, like we do, it’s the same idea. Just plug one end of the cable to the back of the corresponding port on the computer and the other into the same port on the monitor. Be careful not to bend any of the fifteen pins on the connectors. Once the cable ends are inserted, tighten the screws on the sides of the connectors to firmly secure the cable in place. The screws on most VGA connectors can be a little difficult to turn because of their small size and the awkward angle you might have to twist your hands to in order to get a good hold of the screws, so just take your time and be sure to tighten all the screws about the same amount.
.jpg?width=688&height=516&name=How%20to%20Set%20Up%20Your%20Computer%20(2).jpg)
Step 4: Connect your peripherals
Now we’re going to plug in your peripherals–your keyboard, mouse, webcam, and anything else you might have. All of these use a connector called USB, which has been a standard connector since the early 2000s. Your computer has several USB ports on the front and the back. The HP Compaq we use has ten USB ports in total, which should be more than enough for most purposes. (You can purchase an inexpensive USB hub from any electronics store if you need more ports to plug in additional devices.)
Just plug the connector into any of the USB slots on the computer. I recommend plugging anything that’s normally going to be connected to the ports on the back. This way, you can make your PC look neater while leaving the ports on the front available for things like USB flash drives, smartphone cables, game controllers, and anything else that would normally only be plugged in while in use.
.jpg?width=688&height=516&name=How%20to%20Set%20Up%20Your%20Computer%20(3).jpg)
Step 5: Network cables (if applicable)
A wired network connection will generally offer the most reliable Internet connection, and if it’s an option for you then it is what we would recommend for the simplest and most robust means of connecting. Simply plug in one end of the cable into the corresponding slot on the back of the computer and the other end into one of the slots on your router (which you may have received from your Internet provider, such as Comcast or Verizon).
.png?width=688&height=518&name=unnamed%20(5).png)
If this isn’t an option for you–either because you can’t run a cable between your router and computer, or you don’t have home Internet–then it’s okay to just skip this step and use wifi instead. All of the computers we give out come with wifi adapters, usually already plugged in. We will set up wifi in the last step.
Step 6: Power the computer on
All of the hardware should be set up now. If you haven’t already, go ahead and plug the computer power cable into the wall and turn the computer on. Nearly all computers are turned on with a button instead of a switch, though the button is placed in different locations on different models of computer. It is almost always the biggest and most prominent button (if it’s not the only button) on either the front or top of the computer. It can sometimes be a little difficult to see if it happens to be the same color as the case of the computer, as it is on our HP Compaq machine.
.jpg?width=688&height=516&name=How%20to%20Set%20Up%20Your%20Computer%20(4).jpg)
Once you press the button (you may have to hold it for up to one second), you should see lights start to flash on the front of the computer. The computer is now “booting”, or starting up. This may take a few minutes to fully load everything the computer needs to operate, so be patient and give the computer time to work. Assuming the monitor is on and set to the right input, you should start to see text and images flash onto the screen as the computer works to start all its different processes. Once you see the login screen (see below), the computer has finished booting and is ready to work.
Step 7: Logging in
This is where things can get a little different if you didn’t get your computer from us. If your computer is running Windows or MacOS, you may not get a screen like this, or if you do then it will look different. Our computers run a variant of the Linux operating system called Xubuntu, and its login screen looks like this:
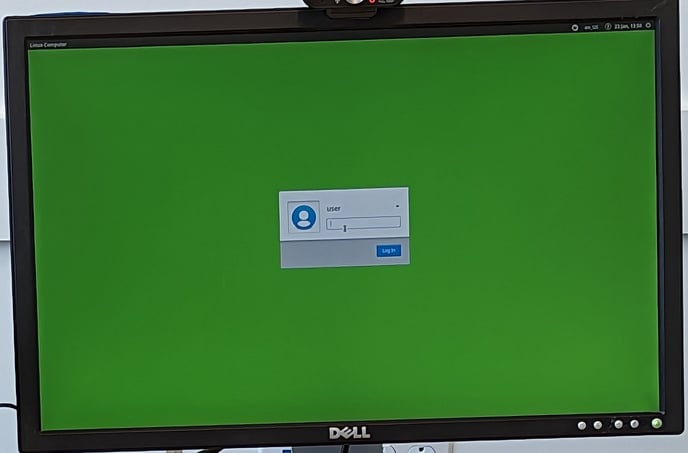
If you received your computer from us, you should have also received a set of papers explaining different things about the computer. On one of these pages, you will find login information (ie, a username and password). (Note, this is different from your wifi name and password.) The username has already been entered (“user” in our example above), so all you need to do is enter your password in the box and either press Enter on your keyboard or click the button labeled “Log in” on the screen.
Once you’ve done that, the computer should start loading the desktop and various programs it needs. Give it a minute or so to load everything, and you should see a desktop that looks like the image below. Once your screen looks like this, your computer is ready for you to start working.
Step 8: Connecting to wifi (if applicable)
If you were not able to connect your computer to your home network by ethernet in Step 5, then we will need to connect to wifi in order for you to be able to access the Internet. If you already connected your computer by ethernet, then you should already be online and you’re ready to go.
.jpg?width=688&height=516&name=How%20to%20Set%20Up%20Your%20Computer%20(5).jpg)
If you look at the bottom-right of the screen, you will see an array of status icons, like in the image below. Look for the wifi icon as indicated in the picture.
.jpg?width=688&height=516&name=How%20to%20Set%20Up%20Your%20Computer%20(6).jpg)
Click on that icon and you should see a list of available wifi networks you can join. You need to find yours. If you received a hotspot from us, you will find the default network name and password printed on a sticker on the bottom of the hotspot.. If you are using a home network and don’t know your wifi and password, you can often find it printed on the bottom of your router. The network name is also sometimes called the “SSID”, and you might find it labeled that way on your router. Once you find that network name in the menu, click on it and you will be prompted to enter the password. Type in the password and press the Enter key on your keyboard. The icon on the panel should be replaced by an animated icon showing a spinning circle; this means it’s trying to connect. If it connects successfully, the icon should change to a solid white wifi symbol, like in this image.

If you aren’t able to connect, check to make sure that the password you have entered is correct and try again. If everything goes as expected, you should now be connected to the Internet. Feel free to open a browser like Chrome and try it out.
Conclusion
Congratulations, your computer should now be fully set up and ready to operate. Whether you plan to use your computer to find information online, play games, do homework, or talk to friends, you should be ready. Be sure to check out our other articles and resources to learn more ways to make the most out of your computer.
By
Zach Peterson & Digital Navigator team, Computer Reach